环境要求
- Laravel 6 (实际低版本也能用)
- PHP7.2 且开启redis扩展 (pecl install redis)
- Redis
WARNING
坑1 关于 php的redis扩展
Laravel6 默认是使用 phpredis 驱动 见config/database.php 默认是 'client' => env('REDIS_CLIENT', 'phpredis'),
实测可以安装predis扩展 composer require predis/predis 然后改为 'client' => env('REDIS_CLIENT', 'predis'),
安装 服务端
npm install -g laravel-echo-server
项目根目录,初始化服务端配置,会问一系列问题
laravel-echo-server init
// 是否在开发模式下运行此服务器(y/n) 输入y
? Do you want to run this server in development mode? (y/N)

// 设置服务器的端口 默认 6001 输入 6001就可以了 或者你想要的
? Which port would you like to serve from? (6001)

// 想用的数据库  选择 redis
? Which database would you like to use to store presence channel members? (Use arrow keys)
❯ redis
  sqlite

//   这里输入 你的laravel  项目的访问域名
? Enter the host of your Laravel authentication server. (http://localhost)

// 选择 网络协议 http
? Will you be serving on http or https? (Use arrow keys)
❯ http
  https

// 您想为HTTP API生成客户端ID/密钥吗 N
? Do you want to generate a client ID/Key for HTTP API? (y/N)

// 要设置对API的跨域访问吗?(y/n)N
启动后端
laravel-echo-server start
开启 BroadcastServiceProvider
打开你的 config/app.php 文件并且取消 BroadcastServiceProvider 在这个 Providers 数组中的注释
打开 .env 修改
修改 BROADCAST_DRIVER 的值为你在 laravel-echo-server 初始化时定义的值(Redis 或者 Log) 同时修改 QUEUE_DRIVER 为你喜欢的任何队列驱动程序,在这个示例中你可以轻松的将其更改为 Redis 驱动程序,因为你在前面已经安装并且在运行了。
BROADCAST_DRIVER=redis
QUEUE_CONNECTION=redis
创建一个ExampleEvent事件
php artisan make:event RssCreatedEvent 此命令会在 App/Events 目录下面会创建一个叫做 ExampleEvent.php 的事件类
- 我们在后端添加一个 RssCreatedEvent 事件并继承 ShouldBroadcast
- 包含一个名为rss的频道,频道发送的内容为当前时间
- 我们使用假数据,让它返回当前的时间,方便查看效果
<?php

namespace App\Events;

use Carbon\Carbon;
use Illuminate\Broadcasting\Channel;
use Illuminate\Broadcasting\InteractsWithSockets;
use Illuminate\Broadcasting\PresenceChannel;
use Illuminate\Broadcasting\PrivateChannel;
use Illuminate\Console\Scheduling\Schedule;
use Illuminate\Contracts\Broadcasting\ShouldBroadcast;
use Illuminate\Foundation\Events\Dispatchable;
use Illuminate\Queue\SerializesModels;

class RssCreatedEvent implements ShouldBroadcast
{
    use Dispatchable, InteractsWithSockets, SerializesModels;

    /**
     * Create a new event instance.
     *
     * @return void
     */
    public function __construct()
    {
        //
    }

    /**
     * Get the channels the event should broadcast on.
     *
     * @return \Illuminate\Broadcasting\Channel|array
     */
    public function broadcastOn()
    {
        // 14. 创建频道
        return new Channel('rss');
        // return new PrivateChannel('channel-name');
    }

    /**
     * 指定广播数据。
     *
     * @return array
     */
    public function broadcastWith()
    {
        // 返回当前时间
        return ['name' => Carbon::now()->toDateTimeString()];
    }
}
接下来装客户端扩展
$ npm install --save socket.io-client
$ npm install --save laravel-echo
客户端配置连服务端及监听频道
打开 resources/assets/js/bootstrap.js 文件
import Echo from 'laravel-echo'

window.io = require('socket.io-client');
window.Echo = new Echo({
    broadcaster: 'socket.io',
    host: window.location.hostname + ':6001'
});
修改 resources/js/components/ExampleComponent.vue
<template>
    <div class="container">
        <div class="row justify-content-center">
            <div class="col-md-8">
                <div class="card">
                    <div class="card-header">Example Component</div>

                    <div class="card-body">
                        <ul>
                            <li v-for="name in names" :key="name">{{ name }}</li>
                        </ul>
                    </div>
                </div>
            </div>
        </div>
    </div>
</template>

<script>
    export default {
        data () {
            return {
                names: []
            }
        },
        mounted() {
            let that = this;
            // 12. 创建 Echo 监听
            Echo.channel('rss')
                .listen('RssCreatedEvent', (e) => {
                    console.log(e);
                    that.names.push(e.name)
                });
        }
    }
</script>
ExampleComponent.vue
修改 resources/views/welcome.blade.php
<div class="content">
    <div class="title m-b-md">

    </div>
    <example-component></example-component>
</div>
为了模拟后端有数据,添加一个路由
打开 routes/web.php
Route::get('test-broadcast', function(){
    broadcast(new \App\Events\RssCreatedEvent());
});
测试
WARNING
坑2 使用广播必须开启队列
执行 php artisan queue:listen --tries=1
然后浏览器先打开你的后台地址 your-host
访问后 your-host/test-broadcast
浏览器network中可以看到有数据过来了 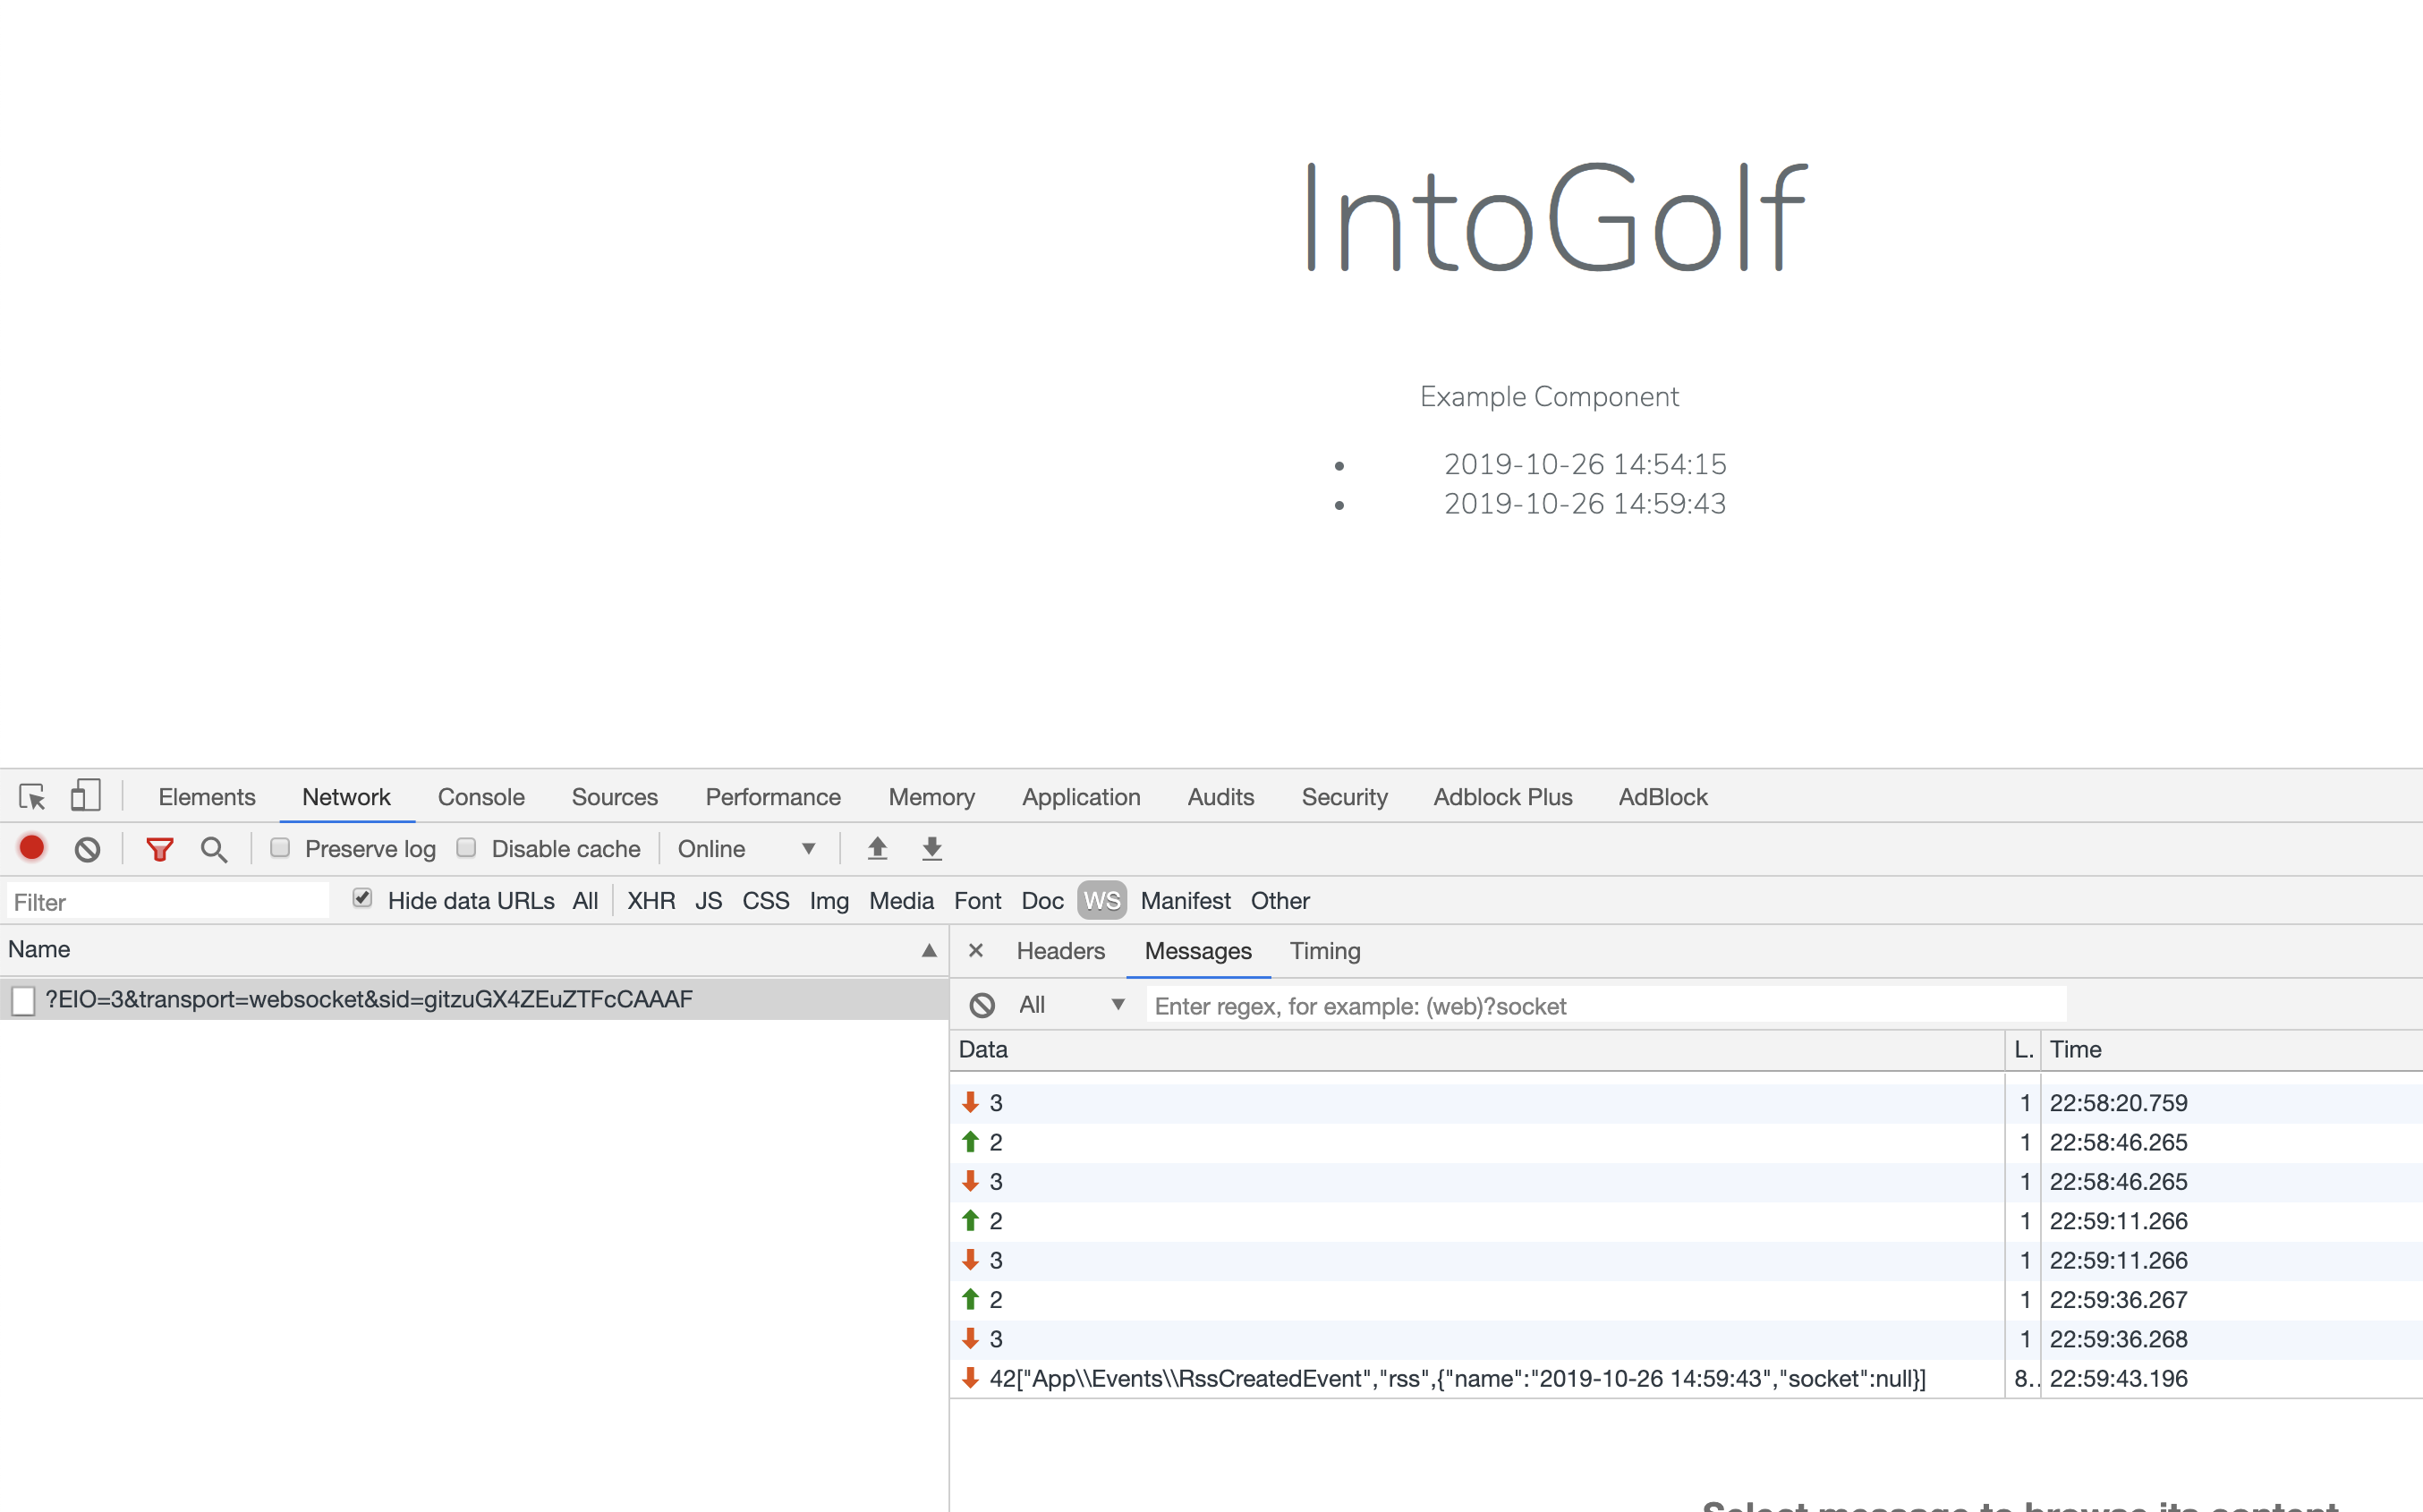
队列也能看到变化 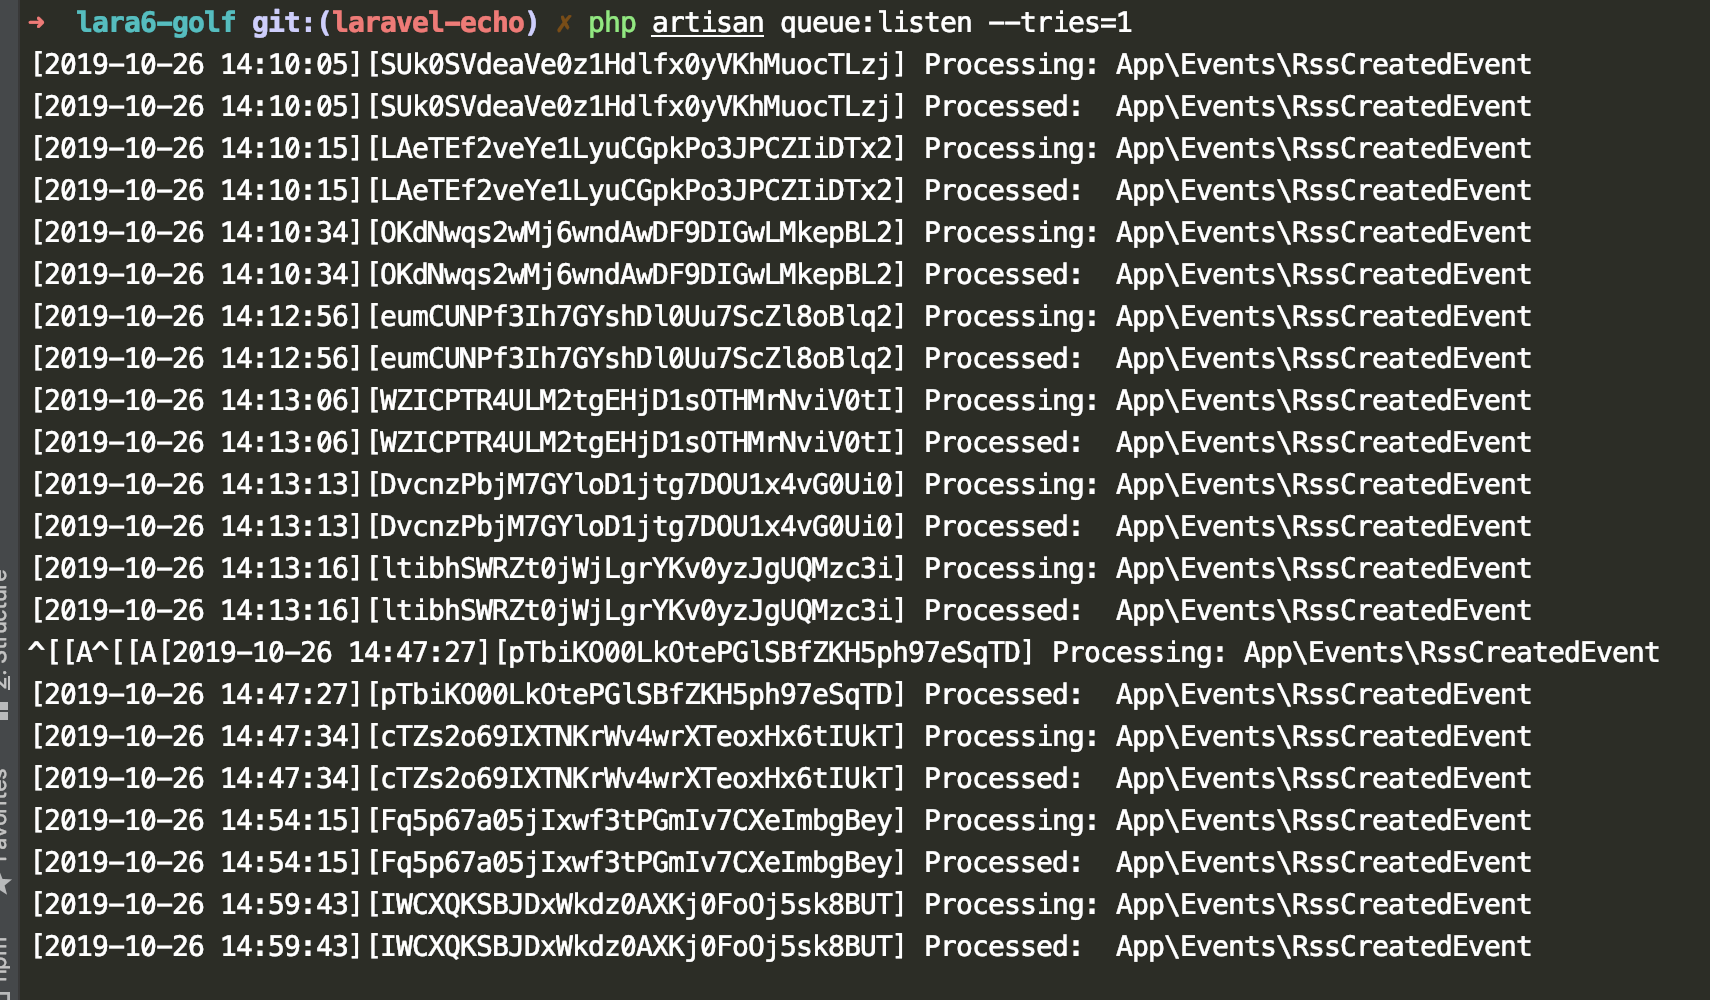
laravel-echo-server 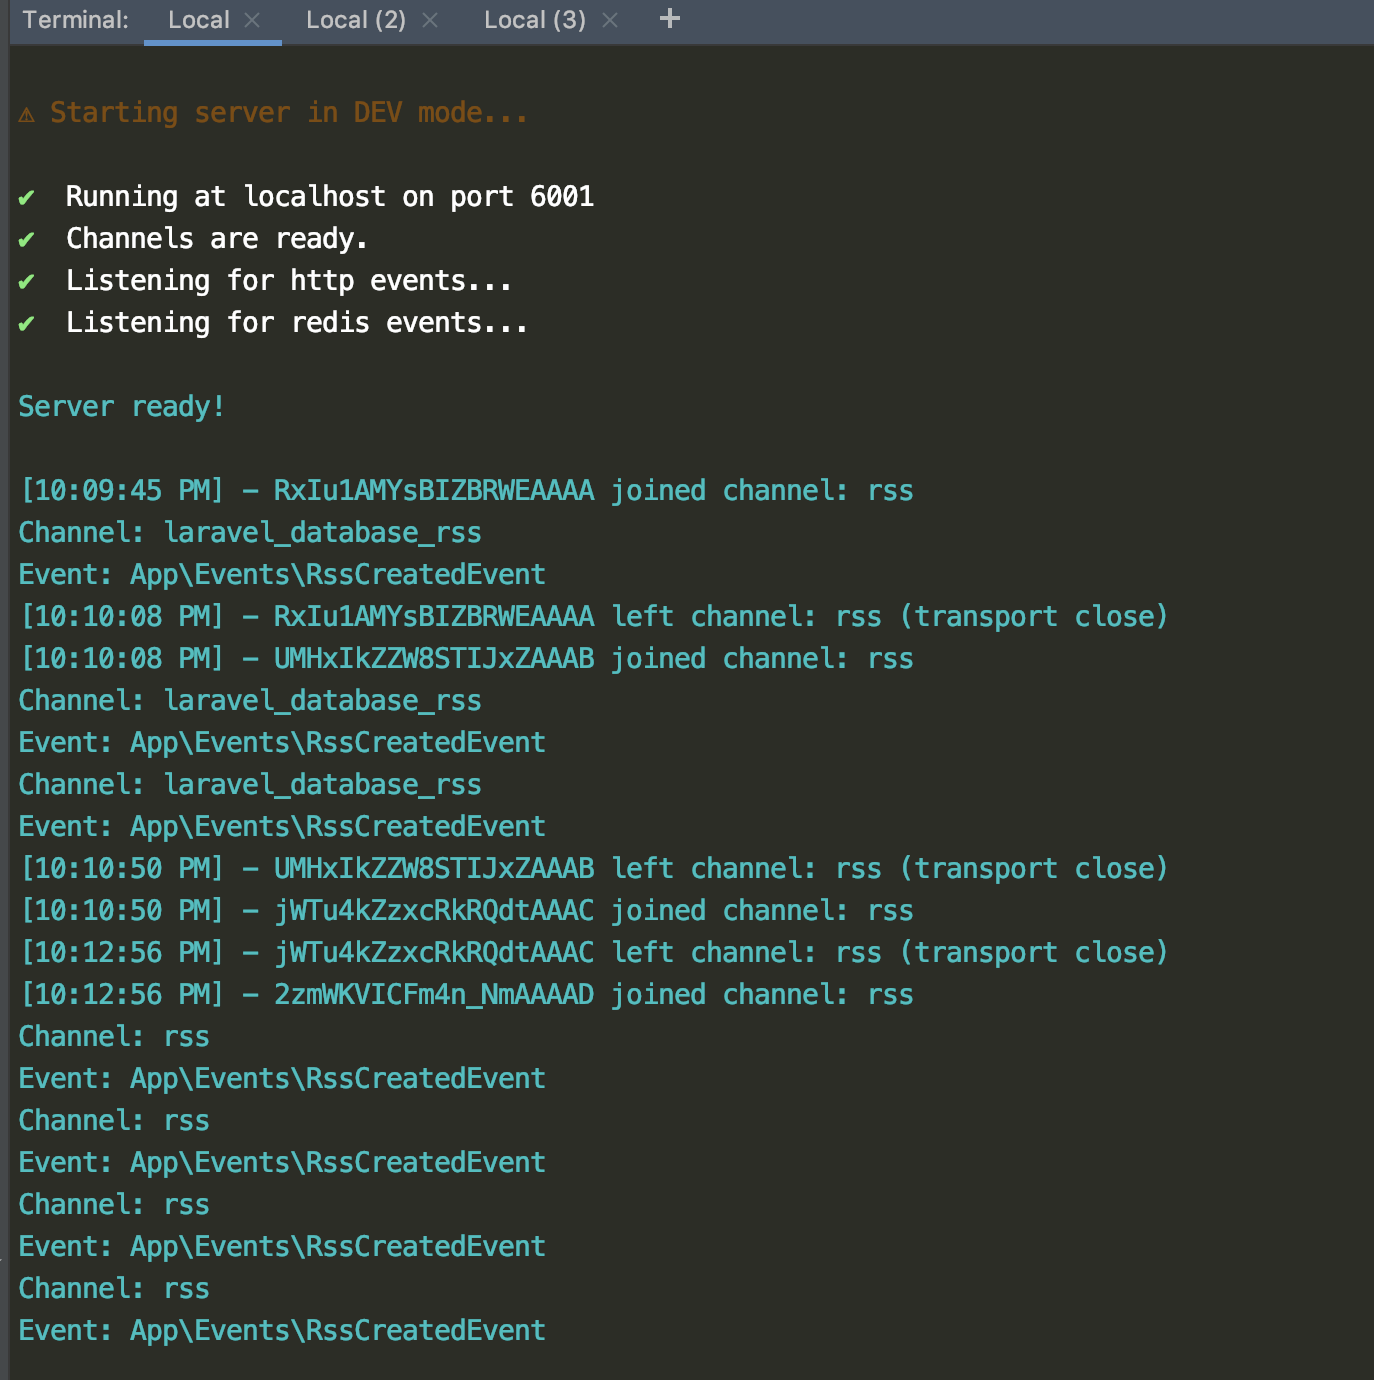
WARNING
坑3 注意 Channel 名称和 Event名称
Laravel 会自动给Channel加前缀,默认把这行掉 config/database.php'prefix' => env('REDIS_PREFIX', Str::slug(env('APP_NAME', 'laravel'), '_').'_database_'),

正式环境
- 修改
laravel-echo-server.json关闭 devMode - 使用 pm2 管理 laravel-echo-server 创建 Socket.sh 内容
#!/usr/bin/env bash

laravel-echo-server  start
pm2 start socket.sh
关于数字含义
socket.io的frame里面,每个片段前面的数字代表什么意思?
这是 Engine .io协议,其中的数字是数据包编码:
<Packet type id> [<data>] 例:
2probe 这些是不同的数据包类型:
0 open
在打开新传输时从服务器发送(重新检查)
1 close
请求关闭此传输,但不关闭连接本身。
2 ping
由客户端发送。服务器应该用包含相同数据的乓包应答
示例1.客户端发送:2probe 2.服务器发送:3probe
3 pong
由服务器发送以响应ping数据包。
4 message
实际消息,客户端和服务器应该使用数据调用它们的回调。
实施例1
服务器发送:4HelloWorld客户端接收并调用回调socket.on('message',function(data){console.log(data);});
实施例2
客户端发送:4HelloWorld服务器接收并调用回调socket.on('message',function(data){console.log(data);});
5 upgrade
在engine.io切换传输之前,它测试,如果服务器和客户端可以通过这个传输进行通信。如果此测试成功,客户端发送升级数据包,请求服务器刷新其在旧传输上的缓存并切换到新传输。
6 noop
noop数据包。主要用于在接收到传入WebSocket连接时强制轮询周期。